Make a New Board
- Click on the plus sign in the upper right-hand corner or click Create Board. You have to add a title to make the project or it’s a no go.
- Click a background picture. (Click the three dots for more photos but, be warned, it’s a black hole of awesome pics.)
- Then press the green Create Board button. The project is autosaved to the cloud.
Adding Cards
- Click on Add Card.
- Type a title for the card. Hit enter. Trello will automatically ask for the title of the next card, even if you don’t need a card. It’s annoying but eh, whatcha gonna do?
Data on the Card
- Click on a named card.
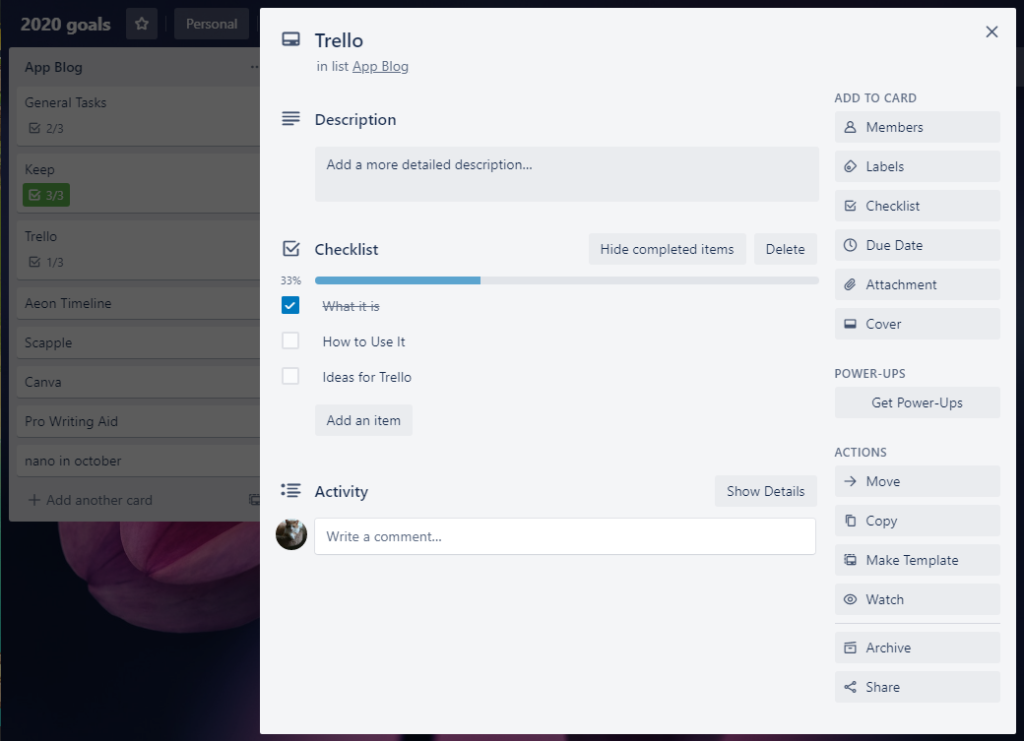
- Add a description or comments as needed. This feature can be used on a shared board to talk with others as well as a spot to jot down your own thoughts.
Specifics for Cards
On the right side of the card, add activities/features for the card:
- Members: Add anyone who will work with you on this project. See below about team members.
- Labels. Type the label, choose a color, or make it color-blind friendly. Multiple labels can be added. Think #hashtags.
- Check List. (My favorite) Title the checklist and it will appear on the left. Add items to your checklist. Hit enter or Add.
- Due Date: Give the project a deadline. Use a full calendar and clock to set due dates. Also, Trello can send you a reminder of these deadlines.
- Attachments: Paperclip docs, pics, and web addresses from your computer, Dropbox, Google docs, and more.
- Cover: Add a nice pic for the card to show its purpose. Trello has suggestions. Once the cover is added, the button to change it moves up next to the pic you chose.
Power-Ups
Power-Ups are add-ons to Trello to enhance the program. They range from calendars to analytics to productivity boosts. Power-ups also can connect to other apps such as MailChimp, Dropbox, Google Docs, and Evernote. We could spend weeks exploring these. For now, just know they are there.
Actions
- Move: Move a card to another spot on the board
- Copy: Copy card and move to another spot on the board or another list.
- Make a Template: After designing the card, you can make it a template to use on other cards or boards. Trello has a huge selection of templates—again another week to explore them.
- Watch: Tag card to be notified of any changes. (You or a team member.)
- Archive: Put that card away when finished.
- Share: Show the entire world your awesome project/card. Print, email, embed.
Teams
If you’re not going it alone, you need a team.
- Click on the Home icon (little house) then create a Team.
- Add a name and description of the group.
- Click on Member.
- Type in the people’s email addresses to invite. Click on their name. (If the person is not on Trello, it will still email but states their address is not confirmed.)
- Click Invite to Team. Trello automatically adds them (no permissions, so be careful).
Managing Teams
- To see if you’ve been added to a team, check the Notifications indicator at the top right. A change of color will indicate a notification for you.
- To leave the team, click on the name of the team you have been added to. Click on Members and click on Leave Team.
- At bottom of the page, click on Delete Team to remove the team entirely (admin only).
 Ginny Frost